How do I install and configure TFTP server under Debian or Ubuntu Linux server to configure networking equipment such as remote booting of diskless devices or remote loading of Unix like operating systems via PXE boot?
tftpd is a server for the Trivial File Transfer Protocol. The TFTP protocol is extensively used to support remote booting of diskless devices or loading operating systems. Debian or Ubuntu can use any one of the following tftpd server:
- atftpd – Advanced TFTP server.
- tftpd – Trivial file transfer protocol server.
- tftpd-hpa – HPA’s tftp server.
- dnsmasq – Lightweight DNS, TFTP and DHCP server.
In this tutorial, I am going to install and configure tftpd-hpa.
Warning: TFTP server / protocol provides little security. Make sure a TFTP server is placed behind a firewall system.
tftpd-hpa TFTP server installation
Type the following apt-get command as root user:
$ sudo apt-get install tftpd-hpa
OR
# apt-get install tftpd-hpa
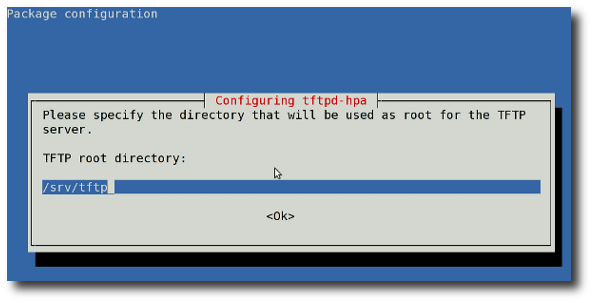
You will be promoted as follows (make sure you set the directory name to /srv/tftp):
Sample outputs:
Reading package lists... Done
Building dependency tree
Reading state information... Done
The following NEW packages will be installed:
  tftpd-hpa
0 upgraded, 1 newly installed, 0 to remove and 15 not upgraded.
Need to get 0 B/49.1 kB of archives.
After this operation, 201 kB of additional disk space will be used.
Preconfiguring packages ...
Selecting previously deselected package tftpd-hpa.
(Reading database ... 281779 files and directories currently installed.)
Unpacking tftpd-hpa (from .../tftpd-hpa_5.0-18_amd64.deb) ...
Processing triggers for man-db ...
Setting up tftpd-hpa (5.0-18) ...
Starting HPA's tftpd: in.tftpd.
Configuration
Edit /etc/default/tftpd-hpa, run:
# vi /etc/default/tftpd-hpa
Sample configuration:
TFTP_USERNAME="tftp"
TFTP_DIRECTORY="/srv/tftp"
TFTP_ADDRESS="0.0.0.0:69"
TFTP_OPTIONS="--secure"
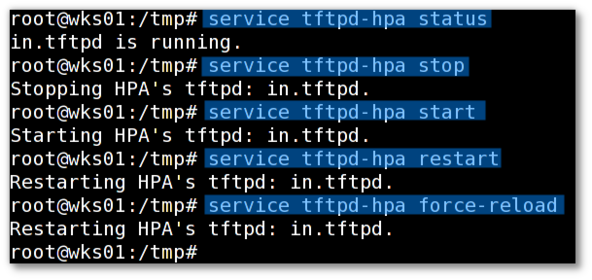
How do I start / stop / restart tftpd-hpa server?
Type the following commands:
service tftpd-hpa status service tftpd-hpa stop service tftpd-hpa start service tftpd-hpa restart service tftpd-hpa force-reload |
Sample outputs:
Next, you need to place all boot files in /srv/tftp directory. You can create a directory structure as follows for various operating systems and third party firmwares:
# cd /srv/tftp

# mkdir {openbsd,freebsd,netbsd}

# mkdir -p linux/{debian,ubuntu,rhel,centos,fedora,suse}

# mkdir -p firmwares/{linksys,cisco,soekris,pata,sata,ipmi,nic}

# ls -l

# ls -l linux/

# ls -l firmwares/
How do I test my tftpd server?
You need to install tftp client called tftp. It is the user interface to the Internet TFTP (Trivial File Transfer Protocol), which allows users to transfer files to and from a remote machine. The remote host may be specified on the command line, in which case tftp uses host as the default host.
Install trivial file transfer protocol client (tftp)
Type the following command:
$ sudo apt-get install tftp
OR
# apt-get install tftp
Sample outputs:
Reading package lists... Done
Building dependency tree
Reading state information... Done
The following NEW packages will be installed:
  tftp
0 upgraded, 1 newly installed, 0 to remove and 15 not upgraded.
Need to get 18.9 kB of archives.
After this operation, 53.2 kB of additional disk space will be used.
Get:1 http://debian.osuosl.org/debian/ squeeze/main tftp amd64 0.17-18 [18.9 kB]
Fetched 18.9 kB in 1s (10.5 kB/s)
Selecting previously deselected package tftp.
(Reading database ... 281794 files and directories currently installed.)
Unpacking tftp (from .../tftp_0.17-18_amd64.deb) ...
Processing triggers for man-db ...
Setting up tftp (0.17-18) ...
Test the tftpd server
In this example, I am putting pxeboot file (second-stage PXE bootstrap for network installs) from OpenBSD.org in /srv/tftp/openbsd/ directory to retrieve with a client, for testing purpose:
# cd /srv/tftp/openbsd/

# wget http://ftp.openbsd.org/pub/OpenBSD/5.2/i386/pxeboot
Sample outputs:
--2012-12-01 17:17:09-- http://ftp.openbsd.org/pub/OpenBSD/5.2/i386/pxeboot Resolving ftp.openbsd.org... 129.128.5.191 Connecting to ftp.openbsd.org|129.128.5.191|:80... connected. HTTP request sent, awaiting response... 200 OK Length: 53920 (53K) [text/plain] Saving to: `pxeboot' 100%[======================================>] 53,920 53.0K/s in 1.0s 2012-12-01 17:17:10 (53.0 KB/s) - `pxeboot' saved [53920/53920] |
I am also downloading bsd.rd file. It is a compressed RAMDISK kernel; the embedded filesystem contains the installation tools:
# wget http://ftp.openbsd.org/pub/OpenBSD/5.2/i386/bsd.rd
Sample outputs:
--2012-12-01 17:17:25--  http://ftp.openbsd.org/pub/OpenBSD/5.2/i386/bsd.rd
Resolving ftp.openbsd.org... 129.128.5.191
Connecting to ftp.openbsd.org|129.128.5.191|:80... connected.
HTTP request sent, awaiting response... 200 OK
Length: 6422208 (6.1M) [text/plain]
Saving to: `bsd.rd'

17% [=====>                                 ] 11,42,782   20.3K/s  eta 3m 47s
Finally, verify that both files are downloaded and installed correctly at the /srv/tftp/openbsd/ location:
# ls -l /srv/tftp/openbsd/
Sample outputs:
total 6344
-rw-r--r-- 1 root root 6422208 Dec  1 17:20 bsd.rd
-rw-r--r-- 1 root root   53920 Aug  1 22:02 pxeboot
Type the following command from the remote client:
$ tftp tftp-server-ip-here

$ tftp 192.168.1.5
Sample outputs (type the commands highlighted in green color at tftp> prompt):
tftp> status
Connected to 192.168.1.5.
Mode: netascii Verbose: off Tracing: off
Rexmt-interval: 5 seconds, Max-timeout: 25 seconds
tftp> get openbsd/pxeboot
Received 54234 bytes in 0.0 seconds
tftp> get openbsd/bsd.rd
Received 6465608 bytes in 0.5 seconds
tftp> quit
Firewall configuration
Add firewall rules to your firewall script to open required ports:
## make sure you load the following modules first ## modprobe ip_conntrack_tftp modprobe ip_conntrack_ftp ## firewall rules to open tcp/udp tftpd port 69 for 192.168.1.0/24 ## /sbin/input -A INPUT -s 192.168.1.0/24 -m tcp -p tcp --dport 69 -j ACCEPT /sbin/input -A INPUT -s 192.168.1.0/24 -m tcp -p udp --dport 69 -j ACCEPT |
Did it worked?
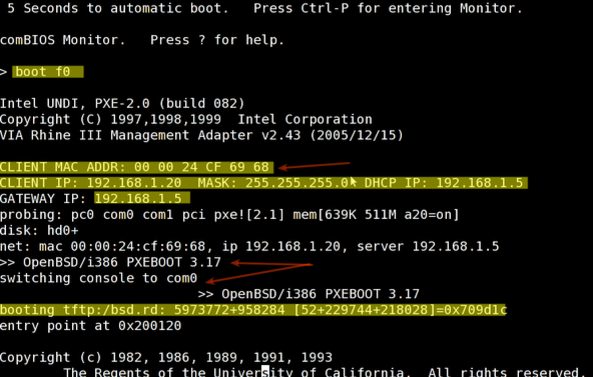
Now, you have DHCP and TFTP services available. Reboot the test system. Turn on PXE network boot in BIOS. Save and reboot the system. You will see information about he BIOS. Press [Enter] (or special key) to start pxe booting. A sample session:

Fig.03: Installing OpenBSD by booting the server via PXE
Share this tutorial on:


