Step-by-Step Procedure
Install Operating System
We’ll use a light OS without desktop environment, so having more power for services instead of wasting CPU and RAM. For this preparation part, please refer to install Raspberry PI OS Lite.
Make your operating system up-to-date:
sudo apt update -y && sudo apt upgrade -Y
Install Lamp Server
Moodle works on apache web server, but requires also PHP and a database to store its data. We’ll install a simple LAMP (Linux Apache Mysql Php) server, changing Mysql with MariaDB which performs better on Raspberry PI.
From terminal, issue following commands:
sudo apt install apache2 -y
sudo apt install php -y
sudo apt install mariadb-server php-mysql -y
Install Requirements
Moodle requires a number of PHP settings and modules to be prepared to work. From terminal, start editing PHP configuration:
sudo nano /etc/php/7.3/apache2/php.ini
Check these settings in your php.ini. For settings which use ON/OFF as their values, you can substitute 1 for ON and 0 for OFF if you prefer. If you change some configurations, don’t forget to restart the server. Bolded comments idenify default php7.3 configuration. You can also leave all as is.
- memory_limit needs to be at least 96M (although some functions may not work if this low). Moodle will refuse to install if lower. 128M is recommended. Large systems may need an even higher setting. > 128 BY DEFAULT
- session.save_handler needs to be set to FILES. > OK BY DEFAULT
- file_uploads needs to be ON. > OK BY DEFAULT
- session.auto_start needs to be OFF. > OK BY DEFAULT
- post_max_size and upload_max_filesize restrict the maximum file size that can be uploaded. > 8M and 2M by defalut
Next list identify php modules and extensions needed or recommended. Bolded comments check if already installed with php7.3. Missing will be installed with the one line apt command at the end of list:
- The iconv extension is required. > OK BY DEFAULT
- The mbstring extension is recommended. > ADDED BELOW
- The curl extension is required. > ADDED BELOW
- The openssl extension is recommended. > OK BY DEFAULT
- The tokenizer extension is recommended. > OK BY DEFAULT
- The xmlrpc extension is recommended. > ADDED BELOW
- The soap extension is recommended. > ADDED BELOW
- The ctype extension is required. > OK BY DEFAULT
- The zip extension is required. > ADDED BELOW
- The gd extension is recommended. > ADDED BELOW
- The simplexml extension is required. > ADDED BELOW
- The spl extension is required. > OK BY DEFAULT
- The pcre extension is required. > OK BY DEFAULT
- The dom extension is required. > OK BY DEFAULT
- The xml extension is required. > ADDED BELOW (same as simplexml)
- The intl extension is recommended. > ADDED BELOW
- The json extension is required. > OK BY DEFAULT
- The appropriate extension for your chosen database is also required. > DONE WITH MARIADB INSTALLATION
- Other PHP extensions may be required to support optional Moodle functionality, especially external authentication and/or enrolment (e.g. LDAP extension for LDAP authentication and the sockets extension for Chat server). > NOT NEEDED IN THIS PROJECT
From terminal, use following command to install missing packages:
sudo apt install php7.3-mbstring php7.3-curl php7.3-xmlrpc php7.3-soap php7.3-zip php7.3-gd php7.3-xml php7.3-intl
We need also to send mail (like for notifications and user registration). Let’s install Exim:
sudo apt install exim4
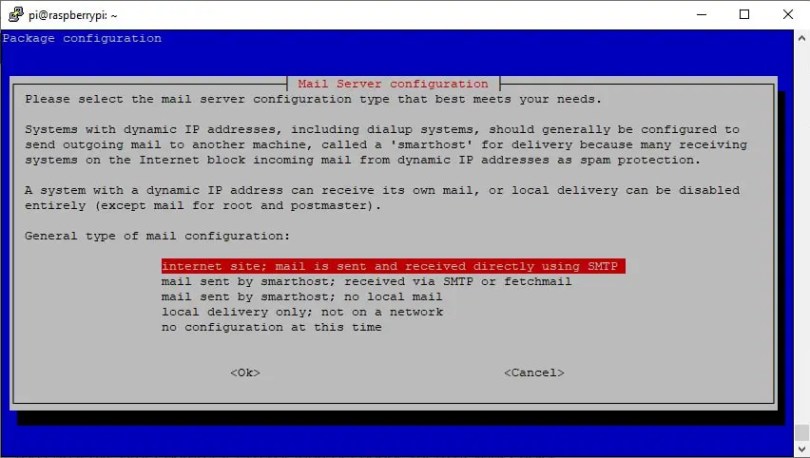
Configure exim in sending mail to external domains:
sudo dpkg-reconfigure exim4-config
Change only first screen configuring installation as internet site:
You can leave all other parameters as default or change them at your choice.
Test sending a mail. Following command will open an Exim session. Terminal will listen what added from user to add it in mail sent (change [email protected]) with your mail:
exim -v [email protected]
Then type:
From: [email protected]
Subject: Exim Subject test
Text to be included in message Body
Then press CTRL+D and your mail will be sent. Once sending is complete, you can press ENTER to go back in terminal prompt.
Also check it in your recipient Spam box that test email has been delivered.
Install and Configure Moodle
We’ll connect to MariaDB with root user (defult password is empty) to create the new database and grant permissions (remember to use semicolumns at the end of each command row as showed below). Before starting, prepare a user/password combination to use instead default ones (moodleuser / moodlepassword):
sudo mysql -uroot -p
Press ENTER if you have still your MariaDB root password empty or type your password and press ENTER. Run following lines, using your prepared DB moodle user and passwod):
CREATE DATABASE moodle DEFAULT CHARACTER SET utf8mb4 COLLATE utf8mb4_unicode_ci;
GRANT SELECT,INSERT,UPDATE,DELETE,CREATE,CREATE TEMPORARY TABLES,DROP,INDEX,ALTER ON moodle.* TO 'moodleuser'@'localhost' IDENTIFIED BY 'moodlepassword';
flush privileges;
quit
Prepare an empty folder for Moodle files:
sudo mkdir /opt/moodle
And grant to www-data (apache user) ownership on this folder:
sudo chown -R www-data:www-data /opt/moodle/
We’ll get Moodle code from git (it will take a while, there are some hundreds of MB to be downloaded):
sudo apt install git
git clone -b MOODLE_39_STABLE git://git.moodle.org/moodle.git
This downloads a copy of Moodle code inside a new local directory in your working folder. Copy downloaded content under /var/www/html/ folder:
sudo mkdir /var/www/html/moodle/
sudo cp /home/pi/moodle/* /var/www/html/moodle/ -r
Copy configuration template to config.php:
sudo cp /var/www/html/moodle/config-dist.php /var/www/html/moodle/config.php
Edit config.php to use your configuration
sudo nano /var/www/html/moodle/config.php
Edit variables according to your configuration (192.168.1.177 is my Raspberry PI IP address, so use your one or external address). You need at least to identify and modify following ones:
$CFG->dbtype = 'mariadb';
$CFG->dbhost = 'localhost';
$CFG->dbname = 'moodle';
$CFG->dbuser = 'moodleuser';
$CFG->dbpass = 'moodlepassword';
$CFG->dataroot = '/opt/moodle';
$CFG->wwwroot = 'http://192.168.1.177/moodle';
Close and save. Assign www-data ownership on html moodle folder:
sudo chown -R www-data:www-data /var/www/html/moodle/
Setup the cron for scheduled jobs:
sudo crontab -u www-data -e
Select “1. /bin/nano” by typing 1 and press ENTER
Append following string:
* * * * * /usr/bin/php /var/www/html/moodle/admin/cli/cron.php >/dev/null
With this setting, our cron will run each minute. Before starting to install moodle, this script needs to run at least 1 time.
From your favourite web browser, use following URL (changing “192.168.1.177” with your one):
http://192.168.1.177/moodle/
From here, installation proceed from web interface.
First screen requires license agreement confirmation:

Read License and Confirm if you want to continue installation.
Next screen shows requirements check:

You will find two final warnins regarding https activation and 64-bits php version. Both checks can be skipped in this moment, this will not intake our test installation. Please click Continue button below this page.
Platform installation and configuration will start now. taking a while (expecially on initial System operations) and will end in a very few minutes, redirecting page to bottom at completion:

Click Continue. Next page will ask you to configure your first admin user. You will be also able to create later other admin users. Required fields are the new password, first name, surname and email address.

Fill forms and click “Update Profile” button. Front page preferences will be shown now.

Configure at your choice, taking care in setting correctly the NoReply address (IP address as domain will not be accepted). An example of corret NoReply address will be “[email protected]”, but change at your choice.
Click “Save Changes”.
Your browser will be finally redirected to admin web dashboard:

From here you are ready to use your Learning Platform.
Please refer to Moodle Docs page for customizing and using your site.
Enjoy!