Updating the Firmware With the ILOM CLI
1. Log onto the ILOM CLI through the Management Ethernet Port (see Using the CLI Through the Management Ethernet Port) or the serial port (see Using the CLI Through the Serial Port).
2. From the ILOM CLI, use the following command:
load -source tftp://tftpserver/ilom.firmware.pkg
where tftpserver is the trivial file-transfer protocol (TFTP) server that contains the update and ilom.firmware.pkg is the firmware image file, for example:
-> load -source tftp://192.168.1.2/ILOM-3_0_6_13_e_r89378-Sun_Blade_X6250.pkg

NOTE: An upgrade takes about 6 minutes to complete. ILOM
      will enter a special mode to load new firmware. No
      other tasks can be performed in ILOM until the
      firmware upgrade is complete and ILOM is reset.

      You can choose to postpone the server BIOS upgrade until the
      next server poweroff. If you do not do that, you should
      perform a clean shutdown of the server before continuing.

Are you sure you want to load the specified file (y/n)? y
Preserve existing configuration (y/n)? y
Delay BIOS upgrade until next server poweroff (y/n)? y
.........................................................................................................................................................

Firmware update is complete.
ILOM will now be restarted with the new firmware.
Resetting the Service Processor
After updating the ILOM/BIOS firmware, you must reset the ILOM SP.
To reset the ILOM SP, you can do any of the following:
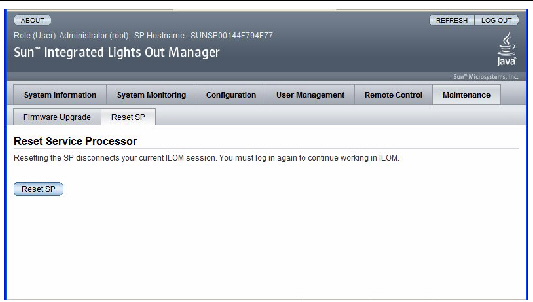
- From the ILOM SP graphical Web interface, navigate to the Maintenance tab and the Reset SP tab, and then click the Reset SP button.
FIGURE 2-3 ILOM Reset Service Processor Window

- From the ILOM CLI, use the following command:
reset /SP
- Using IPMItool, use the following command:
ipmitool -U root -P password -H SP-IP bmc reset cold
where SP-IP is the IP address of the service processor.
- Reset the ILOM SP by shutting down the host, then removing and restoring AC power cords to the system.
For complete details, see the ILOM documentation for your server.
Clearing CMOS Settings (Optional)
If you cannot get output to your serial console after the firmware update, you might have to clear CMOS settings. This is because your default CMOS settings might have been changed by the new BIOS upgrade.
To clear CMOS settings, use the following commands (in this example, the default username, root, and the default password, changeme, are used):
| ipmitool -U root -P changeme -H SP-IP chassis power off ipmitool -U root -P changeme -H SP-IP chassis bootdev disk clear-cmos=yes |
where SP-IP is the IP address of the service processor.
| Note – The -P option might not be available on the Windows and Solaris versions of IPMItool. Instead, IPMItool prompts for a password. |
Recovering the BIOS Firmware
Use the following procedure to recover the BIOS firmware, for example if the BIOS image becomes corrupt, or if the update process fails..
1. Copy the following files to a bootable USB flash device.
Afudos.exe
S90-3B11.ROM
| Note – S90-3B11.ROM is an example. If you have a later file, use it. |
2. Connect the USB flash device to the USB connector on the dongle.
3. Reset the server module.
4. Press F8 to enter display a list of bootable devices.
5. Select the USB flash device from the list.
6. Fun the following command from the DOS prompt.
Afudos S90-3B11.ROM /P /B /K /C /X
The BIOS is updated and the server module restarts.
Recovering the ILOM Firmware
Use the following procedure to recover the ILOM firmware, for example, if the upgrade fails, or if the firmware image becomes corrupt.
1. Copy all the files from the Sun Download area, or Tools and Drivers CD, to a bootable USB flash device.
The files are located in the BMCrecovery directory, on the Tools and Drivers CD. They consist of:
- SOCFLASH.EXE
- DOS4GW
- ilom.X6250-number.bin
Where number is a build number, for example 2.0.3.6-r36158.
| Note – Use the binary (.bin) file, not a .pkg file. |
2. Set up your server module to respond to POST messages and boot prompts.
3. Remove AC power from the system to be updated.
4. Insert the bootable flash drive into the USB port.
5. Connect AC power, and power on the system.
a. A message appears stating that the BMC was not found.
The system takes up to five minutes to boot.
b. Press F8 to get a list of boot devices.
c. Choose the flash device to boot from.
6. Once the flash device is booted, run the following commands:
socflash -p 1 -f sp-binary-file
7. After a successful firmware update, use the -r option to reset the SP:
socflash -r
8. Access the BIOS Setup Utility to confirm that the BIOS does not report that the BMC was not found.
Notes:
- If the backup is selected (-b backup-filename), sufficient free space to store the SP binary backup file must be present on the USB flash device.
- The BIOS is not upgraded by this emergency recovery procedure. Perform a second ILOM-based firmware upgrade to update the BIOS version.
- This emergency recovery procedure returns the SP to the default configuration.
- The ILOM SPBIOS.pkg file format (for example, ilom.X6250-2.0.3.6-r36158.pkg) cannot be used for emergency recovery. Use the ilom2026.bin recovery image instead.