STEP 1: PREPARE YOUR SYSTEM FOR UBUNTU VNC SETUP
Before installing VNC on Ubuntu let’s update the system. First, gain access to your server’s command line. This can be done through SSH remotely, terminal if you are on the server, or whatever method you usually use. Once you’ve gained access to your server, make sure you have the latest packages using the following two commands:
sudo apt-get update
sudo apt-get upgrade
STEP 2: INSTALL A LIGHTWEIGHT DESKTOP ENVIRONMENT
Depending on what flavor of Ubuntu you are using, you may already have a desktop environment. If not, we will have to install a desktop environment. We have previously covered several lightweight desktop options for Ubuntu Server. You only need one of the following options.
Xfce Desktop Environment
Xfce is my favorite desktop environment for home servers. It is very lightweight by nature, easy to use, and is one of the top choices for a VNC server.
sudo apt-get install -y xfce4 xfce4-goodies
Note: adding ‘-y ‘will stop the system giving information about the package sizes, and asking if you want to continue. Remove this if you need to keep an eye on space usage.
Alternatively, you could configure VNC server on Ubuntu with Xubuntu Core. Xubuntu-Core looks visually appealing and yet lightweight without apps such as IM client, mail client, etc. that are not needed on a server.
sudo apt-get install -y xubuntu-core^
Note: The caret(^) at the end of the above command is not a mistake.
Xubuntu-Core is the DE installed on my new Ubuntu 18.04 Server built using Docker.
Gnome Desktop Environment
If you want to go with, Gnome, the default desktop environment that ships with Ubuntu then I suggest installing a lighter version of Gnome using the --no-install-recommends switch.
sudo apt-get install --no-install-recommends ubuntu-desktop gnome-panel gnome-settings-daemon metacity nautilus gnome-terminal -y
If you want the full desktop with all the bells and whistles then you can remove --no-install-recommends switch.
STEP 3: INSTALL VNC SERVER ON UBUNTU
Now that our system is updated and has a desktop environment, we are ready to setup VNC Server on Ubuntu. To install VNC server on Ubuntu, use the following command:
sudo apt-get -y install tightvncserver
Once TightVNC installation completes, it’s time to configure VNC server on Ubuntu according to your preferences.
STEP 4: CONFIGURE VNC SERVER ON UBUNTU
After you setup VNC Server on Ubuntu, there are things that need to be configured: VNC password and VNC session information. To configure VNC server on Ubuntu you need to first start it once using the following command:
vncserver
You will be prompted to enter a password for TightVNC (as shown below), and if you want, a read-only password. A read-only password is great if you want to share your screen with others.
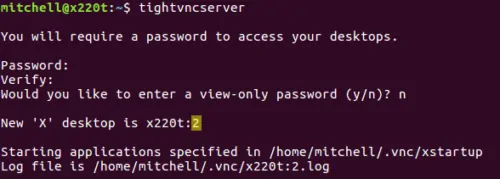
Set password for TightVNC server
Before configuring VNC Server for a specific desktop, you will have to kill all running instances of the TightVNC server. The highlighted number in the image above should be used in place of “X” in the below command
vncserver -kill :X
X starts at 1, so you’ll need to kill all instances. If you’re unsure how many instances you have running, just enter:
ps -ef | grep Xtightvnc
The results of this output are below. Highlighted in yellow are the X values you will need to use with the vncserver -kill :X command.

How to find all running instances of TightVNC
Before proceeding, lets make a copy of your existing / default VNC configuration using the following command:
cp ~/.vnc/xstartup ~/.vnc/xstartup_backup
Configure VNC Server for Xfce Desktop
This should work for both Xfce or Xubuntu desktop. To configure TightVNC to use Xfce, enter the following:
nano ~/.vnc/xstartup
Then, edit the file to make it look like what is shown below (you can copy-paste):
#!/bin/sh
def
export XKL_XMODMAP_DISABLE=1
unset SESSION_MANAGER
unset DBUS_SESSION_BUS_ADDRESS

xrdb $HOME/.Xresources
xsetroot -solid grey

startxfce4 &