How to create Etherchannel in GNS3
I searched most of the Internet to find out how to create ether-channel but couldn’t find right steps. I have tried to make it more complex so that it will help you in many other deployments.
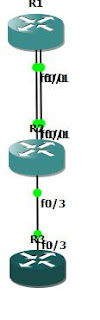
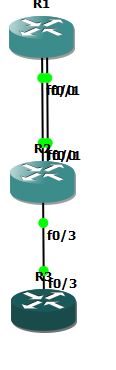
R1——f0/0+f0/1—–R2—->f0/3—>R3
All ports exist in vlan 10. R1 is having vlan 10 interface with ip 192.168.10.1 and the R3 is having ip 192.168.10.2. The successful lab you should be able to ping 192.168.10.1 from R3.
Please note to add the vlan 10 to R1 and R2 before configuring any thing. I found that if introduce vlan at the end it does not work.
R2>
R2>en
R2#vlan data
R2(vlan)#vlan 10
VLAN 10 added:
Name: VLAN0010
R2(vlan)#apply
APPLY completed.
R2(vlan)#exit
APPLY completed.
Exiting….
R2#conf t
Below is the lab steps:
R3:
!
interface FastEthernet0/3
no switchport
ip address 192.168.10.2 255.255.255.0
!
R2—>l2 switch
!
interface Port-channel1
switchport access vlan 10 ——>port channel is also in vlan 10
!
interface FastEthernet0/0
switchport access vlan 10
channel-group 1 mode on
!
interface FastEthernet0/1
switchport access vlan 10
channel-group 1 mode on
!
interface FastEthernet0/2
!
interface FastEthernet0/3
switchport access vlan 10
!
And Finally R1 (I am using l2 etherchannel )
!
interface Port-channel1
switchport access vlan 10
!
interface FastEthernet0/0
switchport access vlan 10
channel-group 1 mode on
!
interface FastEthernet0/1
switchport access vlan 10
channel-group 1 mode on
!
!
interface Vlan1
no ip address
!
interface Vlan10
ip address 192.168.10.1 255.255.255.0
!
Let me know if this helps.
waiting for your feed 🙂